
![]()
DELLORTO FUEL PUMP KIT 1979-1982 RX-7
INSTALLATION INSTRUCTIONS
1
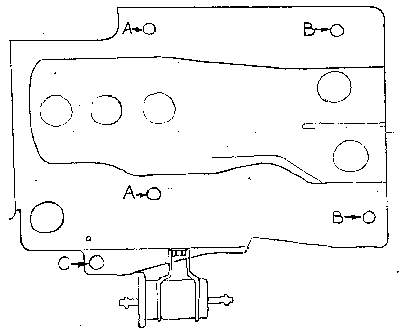
. Slip the fuel filter out of its bracket.2. Refer to the picture below, which shows a bottom view of the Mazda fuel pump mounting shield on the car. Remove the (2) nuts marked "A" and (1) nut marked "C".
3. Remove the (2) bolts marked "B". Remove the fuel pump mounting shield.
4
. Cut the fuel pump wire 1" from the pump.5. (In this step fuel may leak out, so have a catch pan ready). Disconnect, AT THE PUMP, the hose which connects the filter to the pump. Plug the hose temporarily with the plastic cap provided.
6. Remove the other hose from the pump and plug the hose as in the previous step.
7. Remove the (2) rubber mounts from the Mazda pump and, screw them firmly into the (2) threaded positions in the CHASSIS where.the bolts marked "B" originally, were.
8. Prepare the (2) fuel pump wires that come from the chassis by stripping 1/2" of insulation from the ends, then fold the 1/2" long bare section in half, making it 1/4" long and twice the thickness of the rest of the wire.
9. Locate the (2) red wires on the Dellorto fuel pump assembly which are crimped together at one end of a wire connector. Crimp this wire connector to the black wire with the white stripe.
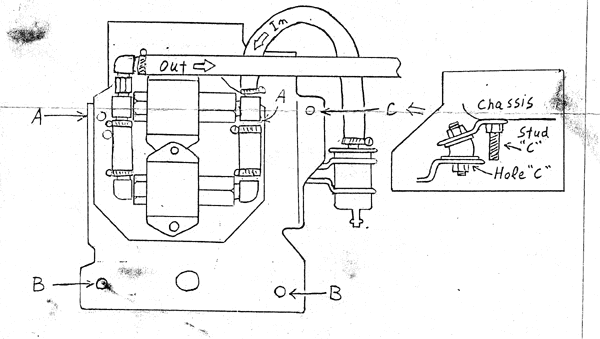
10. Crimp the black chassis wire to the connector on the end of the black wire on the fuel pumps.
11. Connect the hose coming from the filter to the "in" fitting on the pump. Remove the Mazda fuel pump outlet hose, which you had capped in an earlier step, and connect the Dellorto fuel pump outlet hose in its place. Secure both of these hoses with the screw clamps provided.
12. Install the shock mount/bracket assembly included in the kit on stud "C" and position as shown below, but do not tighten the nut.
13
. Mount the fuel pump to the mounting shield as shown in the top view above.14. Install the pump and mount assembly on the (3) shock mounts and tighten the nuts, including the nut on stud "C".
15. Bend the (2) sheet metal shields near the pump mounting shield so that when the pump assembly is shaken vigorously it does not hit them.
16. Check for leaks and proper operation.